
Mistakes with shim stacks often happen when you misplace or misorient shims, or set incorrect tension, causing unreliable shock performance. Rushing or skipping double-checks can lead to misaligned layers and improper calibration, which might take your entire weekend to troubleshoot and fix. To avoid wasting time, guarantee proper placement, orientation, and tension during installation. Keep exploring these key tips, so your next adjustment goes smoothly instead of costing you days of work.
Key Takeaways
- Incorrect shim orientation or misplacement causes uneven damping, requiring extensive disassembly and rework over the weekend.
- Miscounting shim layers leads to improper setup, resulting in multiple troubleshooting sessions extending repair time.
- Rushing assembly increases errors, forcing repeated adjustments and delaying completion to the next available day.
- Failing to double-check shim thickness and alignment causes system failure, necessitating a weekend-long fix.
- Lack of proper tools or resources results in mistakes that demand prolonged troubleshooting, wasting an entire weekend.

Allstar Performance ALL64402 60-Piece 14mm Shock Shim Standard Kit
Placed directly onto the shock shaft to simplify fine tuning of the chassis without disassembling the shock
As an affiliate, we earn on qualifying purchases.
As an affiliate, we earn on qualifying purchases.
Why Mistakes With Shim Stacks Waste Your Weekend
Mistakes with shim stacks can turn a simple job into a weekend-long headache. When you miscalculate shim stack calibration, you risk compromising shock absorber tuning, which directly affects ride quality and safety. Even small errors in shim placement or thickness can lead to uneven damping or unwanted noise, forcing you to redo the entire process. Without proper calibration, your shock won’t perform perfectly, and troubleshooting takes up precious time. Rushing through shim stack assembly often results in overlooked details or incorrect shim orientations, causing frustration and delays. To avoid wasting your weekend, take your time, double-check shim sizes, and ensure proper assembly. Accurate shock absorber tuning starts with careful shim stack calibration, preventing costly mistakes that extend your repair or upgrade timeline. Paying attention to shock tuning techniques can help streamline your process and save valuable time. Additionally, understanding shim stack components can improve your ability to diagnose and correct issues efficiently, especially when combined with proper ADAS sensor calibration practices.

48PCS Metal Shims for Auto Alignment Body,Metal Shims for Leveling with 1/8" 1/16" 1/32" 1/64" for Alignment Tools Automotive,Practical Car Accessories Shim Kit Fits Most Cars
Alignment Card Slot: You can put the shims designed with U-shaped opening slots between the suspension or other…
As an affiliate, we earn on qualifying purchases.
As an affiliate, we earn on qualifying purchases.
Common Causes Of Shim Stack Installation Errors

One common mistake is installing shims with the wrong orientation, which can cause misalignment. Another frequent error is miscounting the number of shim layers, leading to improper spacing. These issues often happen when you’re rushing or not double-checking your setup. Additionally, overlooking proper golf equipment maintenance can contribute to installation errors and affect overall performance. Ensuring accurate measurements and understanding visual and auditory cues can help prevent these common mistakes. Being aware of floating on water conditions can also influence how you approach shim stacking in specific scenarios. Moreover, paying attention to body jewelry measurements and materials can help maintain proper fit and function during installation, reducing the risk of errors. Recognizing how emotional well-being impacts your focus can help you stay attentive during precision tasks like shim installation.
Incorrect Shim Orientation
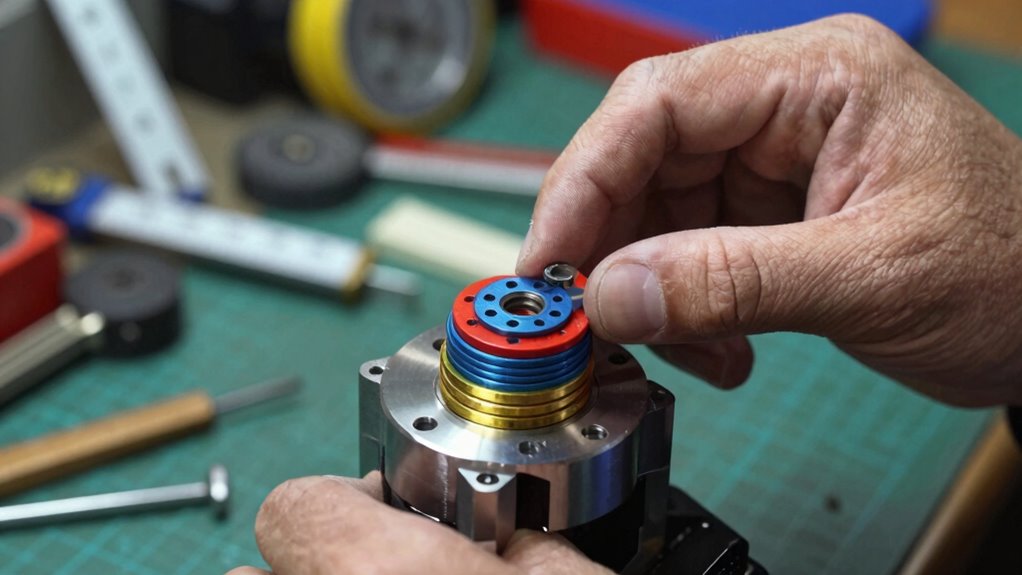
Incorrect shim orientation is a common cause of shim stack installation errors that can lead to compromised performance or system failure. When you misalign the shim orientation, it creates stack misalignment, which affects the system’s stability and efficiency. Ensuring each shim is correctly oriented is essential; otherwise, the entire stack may shift or bind under operational stress. Always double-check the shim orientation before installation, paying close attention to markings or features that indicate proper placement. Failing to do so can result in uneven load distribution, increased wear, and reduced lifespan of components. Proper orientation prevents stack misalignment and helps maintain the integrity of the entire assembly, saving you time and avoiding costly troubleshooting down the line. Additionally, understanding shim stack terminology can help identify and correct orientation issues more effectively, especially when considering high-performance applications. Recognizing the importance of proper installation procedures further minimizes the risk of errors and enhances overall system reliability.
Miscounting Shim Layers
Miscounting shim layers is a frequent error that can undermine the integrity of the entire shim stack. When you miscount shim layers, you risk creating layer errors that compromise alignment and stability. Shim miscounting often happens during setup or reassembly, especially if you’re juggling multiple shims or working in tight spaces. It’s easy to lose track of the number of layers or accidentally add an extra shim, leading to improper spacing. These layer errors can cause uneven wear, misalignment, or even mechanical failure down the line. To prevent this, double-check your shim count at each step, use clear labeling, and verify the number of shims before installation. Proper shim stack assembly ensures the stack functions correctly and saves you from costly troubleshooting later. Additionally, understanding the importance of layer consistency helps maintain the overall quality of the assembly. Paying close attention to accurate measurement techniques can help avoid these common mistakes and ensure long-term performance.
Allstar Performance ALL64402 60-Piece 14mm Shock Shim Standard Kit
Placed directly onto the shock shaft to simplify fine tuning of the chassis without disassembling the shock
As an affiliate, we earn on qualifying purchases.
As an affiliate, we earn on qualifying purchases.
How To Properly Install And Adjust Shim Stacks

To properly install and adjust shim stacks, you need to start by carefully selecting the correct shims based on your suspension’s specifications and intended performance. Begin with precise fork alignment to ensure the stanchions are perfectly straight, which helps prevent uneven wear and performance issues. When assembling the shim stack, choose a suitable lubricant selection—use a light, compatible lubricant to reduce friction and prevent corrosion. Carefully layer each shim, ensuring they’re seated flat and aligned properly, avoiding any tilts or gaps. During installation, double-check the fork alignment and make sure everything moves smoothly. Properly adjusting the shim stack involves incremental testing and fine-tuning, so take your time to achieve excellent performance without forcing components. Additionally, understanding how sound vibrations can influence cellular regeneration and overall health can inform your approach to maintaining optimal suspension performance. Paying attention to vibration damping techniques can further enhance the longevity and reliability of your setup. Incorporating proper maintenance routines ensures your suspension works reliably and lasts longer. Being aware of suspension wear patterns can help you identify issues early and prevent costly repairs in the future. Recognizing the importance of correct installation procedures can significantly reduce the risk of errors and improve overall suspension durability. This careful approach ensures your suspension works reliably and lasts longer.

Lisle 20400 Universal Shock Absorber Tool
For Removing and Installing Shock Nuts.
As an affiliate, we earn on qualifying purchases.
As an affiliate, we earn on qualifying purchases.
Troubleshooting When Your Shim Stack Isn’t Working Right

If your shim stack isn’t performing correctly, start by checking the placement of each shim to make certain they’re in the right order. Next, verify that the stack tension feels appropriate—too tight or too loose can cause issues. Addressing these points helps restore proper function and prevents further problems. Additionally, ensure that the shim stack is free of debris or corrosion, which can impair its performance. Regular maintenance checks can help identify wear and tear early before they lead to more significant malfunctions. Incorporating preventative measures can further extend the lifespan of your shim stack and ensure consistent operation.
Correct Shim Placement
When your shim stack isn’t performing correctly, the first step is to double-check the placement of each shim. Proper positioning ensures the shim material and shim thickness work together as intended. Misaligned shims can cause inconsistent performance or failure.
- Confirm each shim is correctly oriented, especially if they’re asymmetric.
- Ensure shims are stacked in the intended order, matching the design specifications.
- Check that shim thickness is consistent and appropriate for your setup.
- Verify none are cracked, bent, or damaged, which can compromise function.
Taking these steps helps your shim stack function smoothly. Remember, even small misplacements can lead to big issues, so precision is key. Correct placement keeps your setup reliable and prevents wasted time troubleshooting later.
Proper Stack Tension
Even if your shim stack is correctly placed, improper tension can still cause problems. Too tight or too loose shims affect spring preload and shock tuning, leading to inconsistent performance. If the tension is too high, you’ll find your suspension feels stiff and unresponsive, making your ride harsh. Conversely, too loose, and the shock may feel soft or bottom out easily. To troubleshoot, carefully adjust shim thicknesses or stacking order to fine-tune the tension. Always check your spring preload settings first, as they directly influence overall shock behavior. Proper stack tension guarantees your suspension responds smoothly and maintains the right balance between support and compliance. Remember, small adjustments can make a significant difference in shock tuning and ride quality. Understanding stack tension is essential for achieving optimal suspension performance.
Tools And Resources To Help You Get It Right The First Time

To guarantee you get it right the first time, leveraging the right tools and resources can make all the difference. A solid tools overview helps you select the best equipment, while a thorough resource guide provides step-by-step instructions and troubleshooting tips. These tools minimize errors and save you time. Consider investing in quality measurement devices like dial gauges or feeler gauges to ensure precise shim stack assembly. Digital design software can help you visualize and plan your setup accurately. Online forums and expert blogs offer community insights and real-world advice. Finally, tutorials and video guides can walk you through complex procedures, reducing guesswork. Using these resources ensures a smoother process and prevents costly mistakes, making your project more efficient and successful.
Preventing Future Shim Stack Mistakes To Save Time
By implementing proactive strategies now, you can considerably reduce the chances of making shim stack mistakes in the future. Start by thoroughly reviewing installation instructions and double-checking each shim’s size and placement before proceeding. Keep a detailed record of your shim stack configuration, so you can easily reference it if adjustments are needed later. Avoid rushing through the process, as hurried installation errors often lead to costly mistakes. Use precision tools and ensure all components are clean and properly aligned. Regularly inspecting your shim stack during installation helps catch issues early. Training and practice are also key — the more familiar you are with proper techniques, the less likely you are to make errors. Preventative measures today save you significant time and frustration tomorrow.
Key Tips For Maintaining And Adjusting Shim Stacks Effectively
Maintaining and adjusting shim stacks requires careful attention to detail and a methodical approach. To maintain performance ideal, you must monitor shim material quality and stick to a consistent maintenance schedule. Regular inspection helps identify wear or corrosion early, preventing costly mistakes. When adjusting, document each change meticulously to track the effects on alignment or clearance. Always handle shims gently to avoid damaging their surfaces, which can compromise accuracy. Keep tools clean to prevent debris from contaminating the shim stack. Using high-quality shim material ensures durability, reducing the frequency of adjustments. Establish a clear maintenance schedule and adhere to it, so you catch issues before they escalate. Proper care and precise adjustments save time and keep your system running smoothly.
Frequently Asked Questions
How Do I Identify if My Shim Stack Is Incorrectly Installed?
You can tell if your shim stack is incorrectly installed by checking for signs of installation errors, like uneven compression or unusual noises during operation. Make sure the shims are compatible with your suspension system, as incompatible shims can cause issues. If you notice inconsistent performance or leaks, re-evaluate the shim placement and compatibility, and consider consulting a professional to avoid further problems.
What Are the Signs of a Failing Shim Stack During Operation?
Think of your shim stack as a delicate orchestra, where hydraulic fluid and pressure regulation keep everything in harmony. If you notice inconsistent damping, unusual noises, or a spongy feel during operation, it’s a sign the shim stack is failing. These issues disrupt pressure regulation, causing erratic performance. Stay alert for these symptoms, so you can address the problem before it leads to more extensive damage and costly repairs.
Can Shim Stack Mistakes Cause Long-Term Machinery Damage?
Shim stack mistakes can definitely cause long-term machinery damage if not caught early. Incorrect shim stack calibration or skipping essential maintenance checks may lead to uneven wear, leaks, or component failure. Always follow a detailed maintenance checklist and guarantee proper calibration to prevent costly repairs down the line. Regular inspections help identify issues before they escalate, saving you time and money while keeping your equipment running smoothly.
Are There Specific Brands or Types of Shims Recommended?
You should choose shims made from reliable materials like stainless steel or high-quality plastics, depending on your application. For ideal results, follow proper installation techniques, ensuring the shims are clean, correctly sized, and evenly placed. Avoid cheap or poorly manufactured shims, as they can deform or cause misalignment. Using trusted brands and adhering to best practices helps prevent mistakes and guarantees long-lasting, efficient machinery operation.
How Often Should I Review and Adjust My Shim Stacks?
You should review and adjust your shim stacks regularly, ideally during your maintenance schedule, to guarantee peak performance. Check them after heavy use or if you notice issues like uneven wear or noise. Incorporate troubleshooting tips, such as inspecting for misalignment or damage, every few rides or monthly. Staying proactive helps prevent costly mistakes and keeps your equipment functioning smoothly, saving you time and frustration in the long run.
Conclusion
Now that you know the common pitfalls and how to avoid them, imagine the time you’ll save by getting it right the first time. But what if there’s a mistake you haven’t spotted yet? One small oversight could turn your weekend project into a frustrating nightmare. Stay vigilant, double-check your work, and keep learning. The next breakthrough in your shim stack skills might just be one tweak away—are you ready to discover it?