If your Milwaukee M18 charger keeps blinking red, it can be frustrating and hinder your work. This blinking indicator typically signals an issue with the battery, charger, or connection. Fortunately, most problems are fixable with some simple troubleshooting steps. Knowing what causes the blinking and how to address it can save you time and money, preventing unnecessary replacement or service visits.

Get business pricing on garage and car supplies
- Business-only prices and quantity discounts
- Tax-exempt purchasing
- Multiple users, one account, clear invoices
In this guide, we’ll walk you through practical, safe, and effective methods to diagnose and resolve the blinking red light on your Milwaukee charger, ensuring your tools are ready for your next project.
Key Takeaways
| Identify the cause | Understanding why your charger blinks red is key to fixing it. |
| Check battery compatibility | Using the correct and healthy batteries prevents charging issues. |
| Inspect connections | Loose or dirty contacts can cause blinking lights. |
| Follow safe troubleshooting steps | Always unplug and handle batteries carefully. |
| Contact support if needed | Persistent issues may require professional help. |
Understanding the Red Blinking Light
The blinking red light on your Milwaukee charger indicates a specific issue. Typically, it signals that the charger detects a problem with the battery, such as an overload, high temperature, or improper connection. Refer to your charger’s manual for exact fault codes, but generally, a slow blinking red indicates a charging problem, while rapid blinking may mean an error or fault. Recognizing these signals helps you troubleshoot effectively and safely.
Step 1: Ensure Proper Battery Insertion
- Remove the battery from the charger and inspect the contacts for dirt, debris, or corrosion.
- Clean contacts gently with a dry cloth or a soft brush.
- Re-insert the battery firmly into the charger, ensuring it clicks into place and is aligned correctly.
Improper placement or dirty contacts can prevent proper charging and trigger the blinking indicator.
Step 2: Check Battery Health and Compatibility
- Ensure you are using genuine Milwaukee batteries compatible with your charger, like the Milwaukee M18 18V batteries.
- If you suspect the battery is old or damaged, try charging a different, known-good battery to see if the issue persists.
- Look for physical signs of damage, swelling, or corrosion on the batteries.
Faulty or incompatible batteries can cause the charger to blink red as a safety measure.
Step 3: Verify Charger and Power Source
- Ensure the charger is plugged into a functioning power outlet, preferably a GFCI outlet for safety.
- Check the power cord for damage or fraying.
- Try plugging the charger into a different outlet to rule out power issues.
Power disruptions or damaged cords can cause blinking lights or prevent proper charging.
Step 4: Assess Temperature and Environmental Conditions
- Ensure the charger and batteries are used within recommended temperature ranges, typically between 32°F and 104°F (0°C to 40°C).
- Avoid charging in extremely hot or cold environments, as this can trigger a safety shutdown indicated by blinking lights.
- Allow batteries and charger to reach room temperature before attempting to charge again.
Overheating or cold conditions can cause the charger to blink red as a protective measure.
Step 5: Reset and Test
After addressing the above points, try resetting the charger by unplugging it for a few minutes. Reinsert the battery and plug the charger back in. Observe the blinking pattern; a steady green light indicates successful charging. If the red blinking persists, further troubleshooting or professional assistance may be necessary.
The Products in This Guide
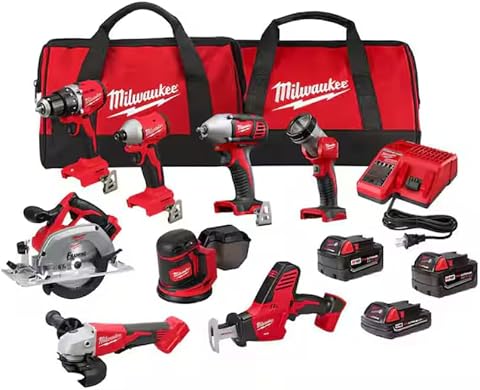
Milwaukee M18 18V Cordless Power Tool Combo Kit
- ✔ Voltage: 18V
- ✔ Battery Capacity: Up to 5Ah
- ✔ Number of Tools: 8
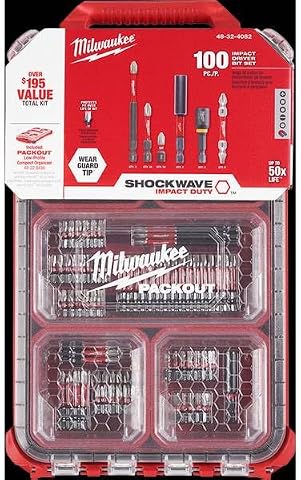
Milwaukee Shockwave 100pcs Impact Driver Bit Set Packout
- ✔ Pieces: 100
- ✔ Case: Packout
- ✔ Impact Rating: Yes
Milwaukee M18 18V Cordless Power Tool Combo Kit
The Milwaukee M18 18V Cordless Power Tool Combo Kit offers a comprehensive set of tools with high-performance batteries and a charger included. It’s ideal for professional and DIY projects alike, providing versatility and durability.
Pros:
- Includes 8 tools for a wide range of tasks
- Comes with 3 batteries for extended use
- Fast charger minimizes downtime
- Durable construction for tough jobs
Cons:
- Heavy for extended handheld use
- Some tools may be overkill for simple tasks
Best for: Construction, remodeling, and maintenance projects needing versatile tools
Not ideal for: Light-duty or occasional DIY use where fewer tools suffice
Bottom line: A versatile, high-performance kit perfect for demanding jobsites.
Milwaukee Shockwave 100pcs Impact Driver Bit Set Packout
The Milwaukee Shockwave 100pcs Impact Driver Bit Set Packout offers a comprehensive collection of impact-rated bits housed in a durable case, ideal for heavy-duty fastening and drilling tasks.
Pros:
- Wide variety of bits for different applications
- Impact-rated for durability
- Packout case for organization
- High-quality manufacturing
Cons:
- Bulkier case may be less portable
- Some bits may be unnecessary for casual users
Best for: Professional contractors and serious DIYers needing reliable impact bits
Not ideal for: Occasional homeowners or light-duty users
Bottom line: A comprehensive, durable set ideal for demanding impact work.
Frequently Asked Questions
Why does my Milwaukee charger blink red continuously?
A continuous red blinking light often indicates a problem such as a faulty battery, improper connection, overheating, or a safety lockout. Check the battery contacts, ensure proper placement, and verify the environment’s temperature.
How do I know if my battery is bad?
Signs of a bad battery include physical damage, swelling, inability to hold a charge, or if the charger consistently blinks red despite proper connection. Testing with a known-good battery can help diagnose the issue.
Can environmental factors affect charging?
Yes, extreme temperatures (hot or cold) can prevent proper charging and cause the charger to blink red as a safety feature. Always charge within recommended temperature ranges.
Is it safe to reset my charger?
Yes, unplugging the charger and waiting a few minutes before reinserting the battery is a safe way to reset the system and clear minor faults.
When should I contact Milwaukee support?
If troubleshooting steps do not resolve the blinking red light, or if you suspect a defective charger or battery, contact Milwaukee support for professional assistance or warranty options.
Ensuring Your Milwaukee Tools Keep Powering On
Addressing a blinking red light on your Milwaukee charger is often straightforward, involving cleaning contacts, checking batteries, and verifying environmental conditions. Regular maintenance and understanding indicator signals help you prevent future issues, keeping your tools ready when you need them most. If problems persist despite troubleshooting, professional support can help resolve deeper hardware faults, ensuring your investment remains reliable and efficient.
Affiliate disclosure: As an Amazon Associate we earn from qualifying purchases. Prices and availability are accurate as of the time of publishing.
Fall Picks
fall essentials
As an affiliate, we earn on qualifying purchases.